Linoprint with a die cutting machine
When I show my making-of videos, I often get asked what kind of press I use for my linoprints.
Actually, it’s not a printing press at all but a simple die cutting and embossing machine and it works surprisingly well for printmaking!
I prefer this tool over other methods now because the print results are great.
They’re affordable, take up less space and are much easier to handle if you don’t have a studio or a dedicated printmaking setup at home.

The reason why I prefer using the die cutting machine for linoprinting over other traditional methods like the lever press or wooden spoon I will explain now.
When I first started linocut, I printed everything by hand with a wooden spoon for a long time. Back then I mostly used normal paper or that thin Japanese paper you find in craft stores in the linoprint section. It worked well with that.
Still, it took some effort and patience with the spoon because it I often did not get fully even ink coverage right away (and I am picky with that) so I often had to re-ink parts pf the block and repeat the process.
At some point, the hand lever press from Woodzilla became very popular and I decided to upgrade from my spoon to that one. I think it was around 200 € for the A4 version. I was hoping it would improve the print quality and be faster and less tedious.
I think I expected too much. To this day, I seldom achieved a good opaque ink coverage with that lever press. I still had to rework almost every print with the spoon afterwards anyway. For me it only worked well with a few very thin handmade papers (Kahari). But because it’s so chic, it at least looks great on my cupboard now, collecting dust.
Now that I love using handmade paper that is a bit thicker and more textured, it’s even worse with the lever press and spoon. Only the die cutting machine handles it really well and gives me great print results.
I want to stress that this is only my personal experience, based on the papers I use and my expectations regarding opacity and evenness. I have seen printmakers getting great results with spoon or hand lever press on all kinds of papers. Maybe it´s just me.

Machine explained
Die cutting machines are usually designed for crafts like cutting shapes and make embossed designs. But with a few simple tricks, you can easily repurpose them for linoprinting.
I bought mine here and I think in other countries it’s sold under the brand name “Bira.” But of course, there are other die cutting & embossing machines you can check out. I chose this one because I can print up to A4 and it takes up less space than others and you can fold up the wings and even remove the handle, which can be stored inside one of the wing compartments. I also liked the option to adjust the steel rollers using the two dials on the sides. The top dial moves the upper roller down slightly (in 3 steps), and the lower dial can move the lower roller up a bit.
However, I actually leave both rollers as far inward as possible and don’t really use the dials.
Some more details:
- For material up to 21 cm x 29.7 cm (A4 size)
- weight: 8kg
- 2 solid steel rollers
- Plastic housing
- Operated manually with a handle
- Comes with a thick white platform base plate (15mm thick, size 23 x 33 cm)


How does it work?
1. First, ink up your carved linoleum block (no rubber blocks!) just like you would for a traditional linocut print. Use a roller (brayer) to get an even, smooth layer of ink.
2. Next, place the inked block facing up on a stable base plate (platform). Most die cutting machines come with a thick white platform that serves as the base plate. Mine is about 9 x 13 inches and around 15 mm thick.
3. Position your printing paper on top of the linoleum block.
4. Now comes the important part: add a stack of additional paper sheets on top of your print paper. These extra sheets act as a filler to pack up the feed slot and help adjust the pressure.
5. After that, place a felt mat on top of the paper stack. You can find felt mats online and cut them to fit your machine, or use any similar soft material. It helps distribute the pressure evenly and avoids unwanted embossing marks. I think some people also place the felt mat directly on top of the print paper and the paper stack on top of that instead. Just experiment and see what works best for you.
6. Once everything is stacked, insert the whole “sandwich” into the feed slot and gently roll it through the machine with the handle and back again. The pressure from the rollers pushes the paper evenly into the inked block.
7. Afterwards remove everything and peel off the paper to reveal your print.

A few things to consider
This process involves a bit of trial and error at first. You have to make sure the rollers “grab” your “sandwich” with the right amount of “bite”. It should not be too loose and not too tight. Otherwise, you’ll end up with a bad print.
If it runs thru the machine too loose, add one or two sheets of paper to the stack. If it’s too tight, remove one or two sheets.
You can also use the two knobs (dials) on the side to adjust the top and bottom rollers and help get the right grip. In my current setup, I keep both rollers turned as far “inward” as possible because I prefer to fine-tune the pressure by adjusting the stack of paper.
It also depends on the type of paper you’re using. I usually work with textured, deckle-edged paper, which is quite thick. If I used thinner paper, I would probably have to adjust the sandwich and remove one of the sheets from the stack.
Side note: not every die cutting machine has adjustable rollers, and the feed slots also vary in size.


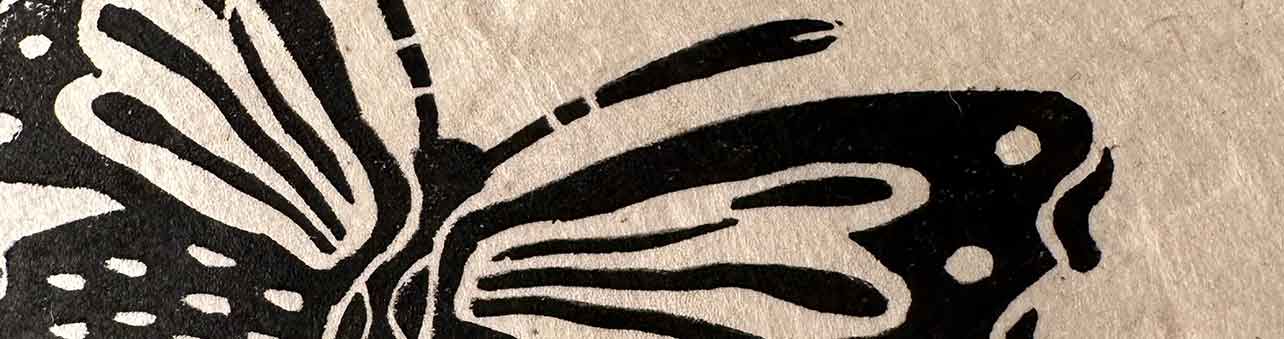
Here are the results from reprinting my rooster brothers (they were out of stock) on my 110 g deckle edged paper.
For the red rooster I used a water based red ink because I love this bright vermilion tone and I still haven’t found it in oil based inks. And I am too lazy for mixing inks.
For the black one I went with an oil based black because oil based relief inks are usually wonderfully opaque.
Most of the time the prints come out great straight from the machine. If there are a few tiny spots missing ink I just touch them up with a tiny brush.
Yes I know that those open spots are actually part of the charm of a linoprint, but I really enjoy a solid and even ink coverage. Just my personal quirk.


The rooster prints are now available in my Etsy shop.

Direct comparison with lever press and wooden spoon
I tested printing this rooster on the same paper using the wooden spoon and the lever press and compared the results, just to confirm what I expected: they were not as good as the prints from my die cutting machine.
See for yourself below.
Wooden spoon: Using this paper, the spoon is a real pain in the arse. The first pull had blank spots everywhere, as you can see in the image. I had to re-ink all the areas and go over them again with the spoon, pressing down centimeter by centimeter with the bottom side.
I ended up doing this three times just to get an “okay” result. If I had to do this for 20 prints, I think I’d lose my mind. And this was only A5 format, not even A4. For me, definitely the loser of these three methods.

Lever press:
I ink the block as usual and place the paper on top. Here it’s also advised to use a felt mat on top. This one came with the press. Then I apply a lot of pressure by pushing the handle down several times to press everything together.
When I check the results, there are many missed spots where the ink didn’t transfer properly into the paper. This is of course also because of the structured paper. I can rework the missing areas by re-inking parts of the block and using the wooden spoon to help. But that just feels like double the work.

Die cutting machine: Just to show again but also with the black rooster, the result is so much better. I hardly see any missing spots and I don´t need help from the spoon. The ink coverage is really good right away even with this structured paper. So this is definitley the winner for me in quality and efficiency!

Disadvantages
Now that I have spoken highly about this die cutting and embossing machine, I still want to point out a 2-3 disadvantages.
With this machine, you can only print up to A4 in width (the shorter side). I’m not even sure if there are die cutting machines at all that can handle larger sizes.
On a positive note, lengthwise you could theoretically print endlessly, you just need a longer platform plate as a base plate.
The feed slot is approximately 2.4 cm open in height (or less) when the rollers are fully inward, so if you use much thicker linoleum plates, the whole sandwich might not fit through. For example, the blue or pink rubber blocks (like Speedy Carve) are quite thick and might not fit unless you use a thinner base plate or reduce the stack of paper a lot. With this machine I do not recommend using rubber blocks anyway.
Above all, the machine has a plastic housing and therefore does not appear very high quality. Even though I have been printing with it for about 3 to 4 years (and it still works well), it feels a bit cheap and not very pretty. That’s why I decorated it a little.
So if you care a lot about looks, this one might not cut it. ;)

DISCLAIMER: I can only recommend using classic battleship gray (or brown) linoleum blocks with this machine. The blue or pink rubber plates (like Speedy Carve, for example) are too soft and I’ve never had good results with them. I think the metal rollers put too much pressure on these softer materials, which can lead to distortion and messy prints.
So if you mostly use rubber blocks, this machine might not be the best choice for you. It really works best with traditional linoleum blocks that can handle the higher pressure.
I also made a YouTube video on this die cutting machine and linoprinting!
Like most of my videos where I talk, it is in german, but you can turn on EN subtitle.

Upcoming blog post:
I honestly have no idea. The last few weeks have been demanding in other areas of life, so I wasn’t able to do any screenprinting. I hope I haven’t forgotten how it works! I still have a burned screen I want to print. Sitting around for many weeks. I hope I can do that soon.
Newsletter Update:
My third newsletter is soon to be send, I think. If you haven’t signed up yet, you can sign-up here.